How to easily deploy your streamlit application on Heroku without any headaches.
I don’t know about you, but the past few days I’ve been playing around with streamlit and I have to say I am very impressed by it.
It’s fast, responsive, and is easy to get a grip on. But the best part is the fact you can edit your python script and see your streamlit application automatically update in real time. In my opinion, working with streamlit is quite enjoyable.
However, once you built your application, why don’t you deploy it so the world could see it? It’s a great way to add interactivity to your data science or data analytics portfolio.
This tutorial will cover step by step on how to deploy your streamlit application on Heroku.
Table of Contents
- Part 1: What files you need?
- Part 2: Working with Heroku through the Heroku CLI (terminal).
- Common Pitfalls To Avoid
- Part 3: Working with Heroku through a Github repository.
Note: I’m assuming you already have streamlit installed and already know a little bit on how to work with it.
Part 1: What files you need?
There are four essential components required to launch your streamlit application on Heroku.
- setup.sh
- requirements.txt
- Procfile
- your_application.py
setup.sh - no credentials needed
mkdir -p ~/.streamlit/

echo "\
[server]\n\
headless = true\n\
port = $PORT\n\
enableCORS = false\n\
\n\
" > ~/.streamlit/config.toml
Note: You do not need to name this file exactly setup.sh, it can be anything however it needs to end with an .sh file extension. However, naming it setup.sh seems to be the norm.
requirements.txt
This file essentially lists all the specific python plugins we will use in our streamlit application. It may look like this.
newspaper3k==0.2.8
streamlit==0.61.0
nltk==3.4.5
Procfile
Note: Name this file as Procfile, do not put any extensions after it. It is a standard text file.
web: sh setup.sh && streamlit run your_application.py
your_application.py
The time consuming part is building your streamlit application, and this is stored as a python script.
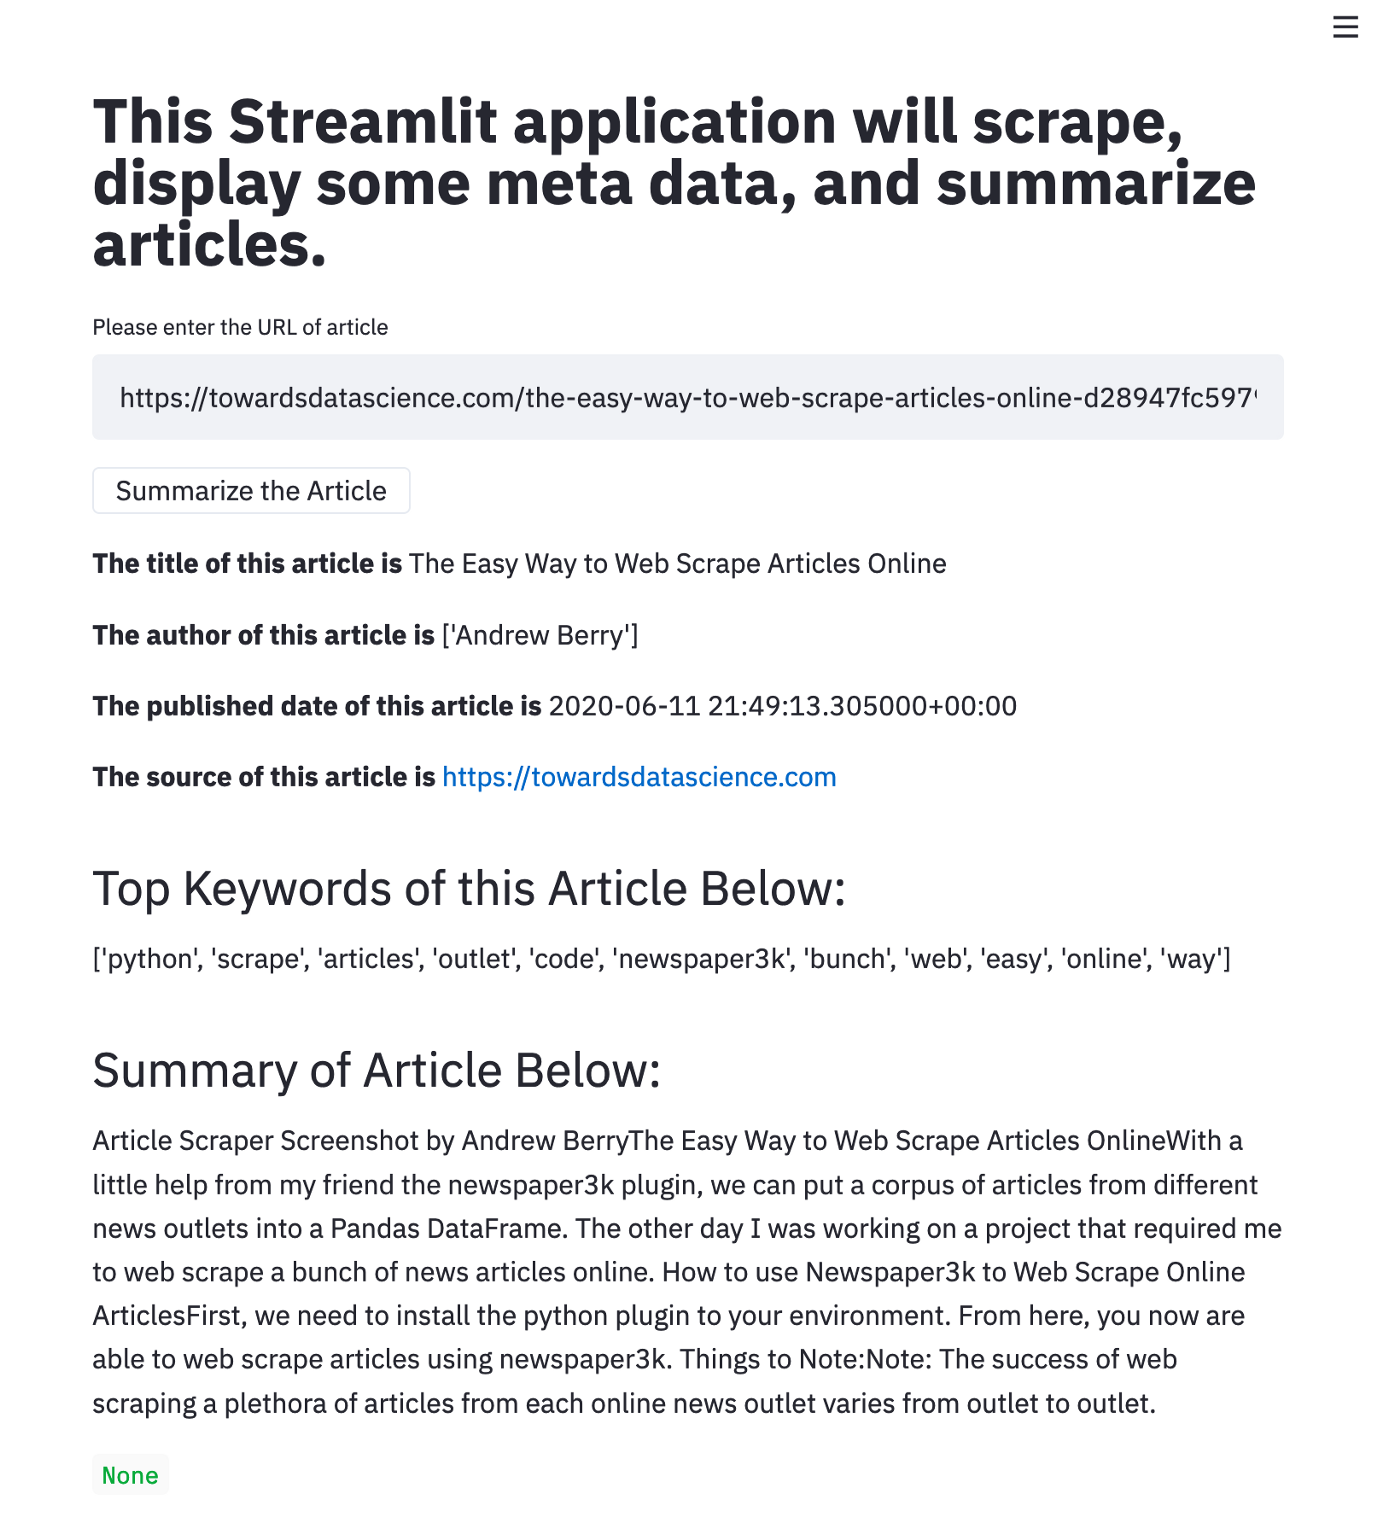
For this tutorial, I made a simple python application based on a medium post on (web scraping articles online)[https://towardsdatascience.com/the-easy-way-to-web-scrape-articles-online-d28947fc5979].
# Important Plugins
import streamlit as st #start off by loading streamlit
import nltk
nltk.download('punkt')

# importing Newspaper3k
import newspaper
from newspaper import Article

# Custom Functions
#---------------------------------

#article downloader
def run_api(user_url_input):
    article = Article(user_url_input)
    article.download()
    article.parse()
    article.nlp()
    return meta_extraction(article)

#article meta extraction + summarizer
def meta_extraction(article):
    st.write('**The title of this article is ** ' + article.title)
    st.write('**The author of this article is **' + str(article.authors))
    st.write('**The published date of this article is **' + str(article.publish_date))
    st.write('**The source of this article is **' + article.source_url)

    st.write('## Top Keywords of this Article Below:')
    st.write(str(article.keywords))
    st.write('## Summary of Article Below:')
    st.write(article.summary)
    return


# Page Design
#-------------------------------
st.markdown('# This Streamlit application will scrape, display some meta data, and summarize articles.')

# Text Input
user_url_input = st.text_input("Please enter the URL of article")

# Button to Run the script
if st.button('Summarize the Article'):
    st.write(run_api(user_url_input))
else:
    st.write(st.markdown('**Button not yet executed.**'))
Before we continue, make sure all those files are in the same directory.
Part 2: Working with Heroku through the Heroku CLI (terminal).
I’m assuming you guys know how to sign up for a Heroku account.
Note: Before we begin with working with Heroku on the terminal, I suggest navigating to the folder where the files from Part 1 of this tutorial is located.
Step 1: Login into Heroku through your terminal.
$ heroku login
You will be redirected to a web page where you can login, or if you are already logged in on your web browser, it will automatically log in to your account that you made.
Step 2: Create a new Heroku instance
Running the code below will automatically create a brand new Heroku application with a random name.
$ heroku create
or you could give it your own name…
$ heroku create name_of_heroku_instance
Step 3: Push your files to the new Heroku application.
$ git push heroku master
This part may take a bit of time because the Heroku application is setting things up and installing the required python plugins on the server. Once, completed it should output this message: remote: Verifying deploy… done.
Step 4: Launching your app
$ heroku open
Voila, there you go! If you followed all the steps above and copied all the code. Your streamlit application on heroku should look like this below.
Common Pitfalls to Avoid
Sometimes you may forget that you already created a remote heroku application in the folder you are working on.
To check, run this code.
$ git remote -v
If it is different, remove this remote connection
$ git remote rm heroku
Then add the correct heroku address that you want your application to be hosted on.
$ git remote add heroku (git.heroku.com/heroku_application.git)
Part 3: Working with Heroku through a Github repository.
Maybe, you don’t really want to push your application files through your terminal. An alternative method is through Github. However, this needs to be done through the Heroku Dashboard on your chosen web browser.
Step 1: Create a new application through the dashboard
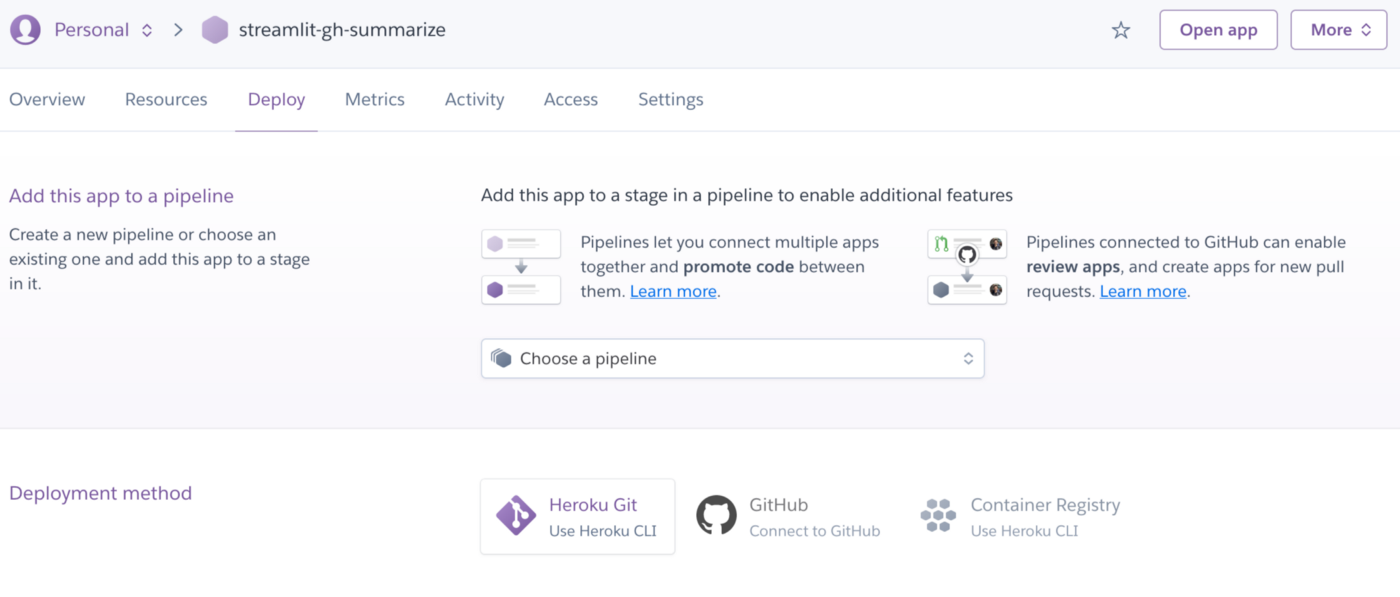
Step 2: Click on the application
Step 3: Click on the Deploy tab
Step 4: Choose Github as the Deployment Method
Step 5: Search for the GitHub repository where you stored the files form Part 1.
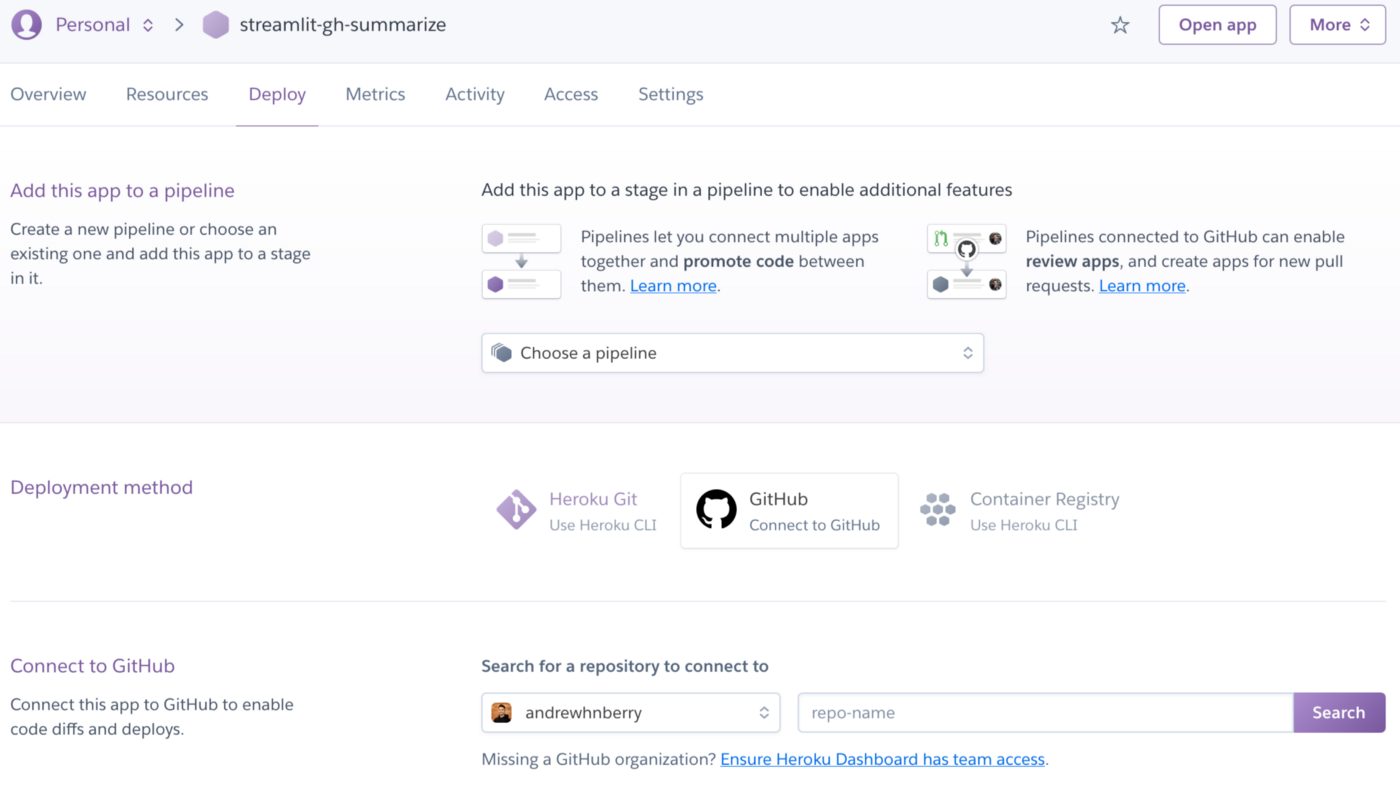
Step 6: Connect to that repository.

Step 7: Deploy branch in Manual deploy section
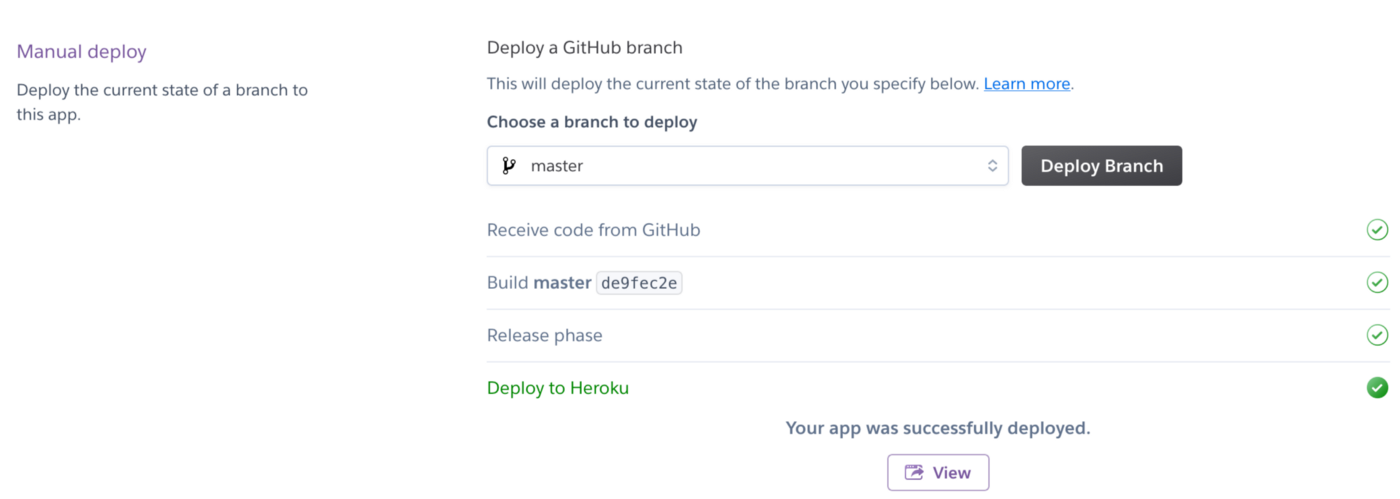
From here you can click on ‘View’ to see your app.
I would also suggest enabling automatic deploys under the Automatic deploys section. This will automatically push the latest master branch from your GitHub whenever it is updated with a new version.
There you go, two ways to deploy your streamlit application on Heroku.